

How To Check WiFi Signal Strength

If you experience a slow internet or the web pages on your browser are not loading, your WiFi connection could be the main issue. You could probably be far from the source, or there are thick obstructions between you and the source. There is no need to get stressed over this issue. Read through this article to learn how to check WiFi signal strength.
Why WiFi Signal Strength Is Important
A connection is said to be reliable when the WiFi signal is strong. Strong WiFi strength gives you full access to internet speeds. However, the WiFi signal strength is dependent on several measures:
- How far you are from the source.
- If you are having a 2.4 or 5ghz connection.
- Thickness of the obstructions between you and the source.
The nearer you are to the router, the more advantage of getting a steady network signal. Though 2.4ghz connections can cover a wide area, they could also have interference challenges. Thicker walls that are constructed with denser materials such as concrete could disrupt a WiFi signal. Alternatively, an individual may experience slower speeds, disconnections, and dropouts when the WiFi signal strength is weak.
When To Check WiFi Signal Strength
Though it should be noted that some connection issues are not due to poor signal strength, this is why it is important to check your WiFi signal strength. If you notice that your device’s internet is poor, before you check the WiFi signal strength, reboot your router. When the issue persists, then you can consider checking the WiFi signal strength using a WiFi site survey. Also, you could test the internet with another device that is connected through ethernet. If the internet remains slow and poor, then the network could be the catch. However, if the ethernet connection is working properly and the router reset does not resolve the issue, it is the right time to check the WiFi signal strength.
How To Check WiFi Signal Strength
Checking the WiFi signal strength is easy, though it may seem difficult for individuals that are not technically inclined. The first thing to do when considering making a check on the WiFi signal strength is to inspect the device having the issue. It would help if you had a WiFi connection indicator for this purpose; the device could be using Android, iOS, Windows, or Mac. The WiFi symbol is made up of nearly four to five curved lines. Those lines fluctuate, but when they are full, it shows that the connection is strong.
Notwithstanding, every phone, tablet, and laptop could show different WiFi strength. However, you can still confirm with a separate device aside from the one having the main issue. For instance, you could try running a test using a tablet after checking the phone with the issue. Make a comparison between these two devices and see what they display as WiFi signal strength. If your result corresponds, then it’s a good start.
Probably, if the WiFi connection at a particular spot is poor, move around the place to discover where the signal is strong. Make sure you focus on the WiFi bars on your device. Note the distance between you and the WiFi. Also, take note of the obstructions between the main source and the device. Please pay close attention to the WiFi bars as it increases and decreases. This is just a rudimentary check-up, but it could help resolve the issue in some cases.
How To Analyze WiFi Signal Strength
Analyzing WiFi signal strength is not a heavy task. There are varieties of WiFi signal strength analyzers. However, most of them function similarly. You could decide to use a wireless spectrum to do your check, such as 2.4ghz or 5ghz. Then, the analyzer can use your chosen spectrum to analyze networks, channels, and signal strength.
In a layman term, WiFi analyzers get information about every access point and channel found on your network. The analyzer then displays it for the user to understand, using a visual method. A quality connection can be maintained when a wireless network analyzer is used. This is essential for checking performance metrics and good for several businesses. As technology advances, WiFi signals are constantly changing alongside. Any little change in your network could affect the overall connection uptime.
It is important to use a WiFi network analyzer to help get data and identify problems. This could proffer a solution such as interchanging with another channel to reduce the load. Another benefit of a good WiFi analyzer is that it can detect spots with weak WiFi signals in your building.
Recommended WiFi Signal Strength Analyzer
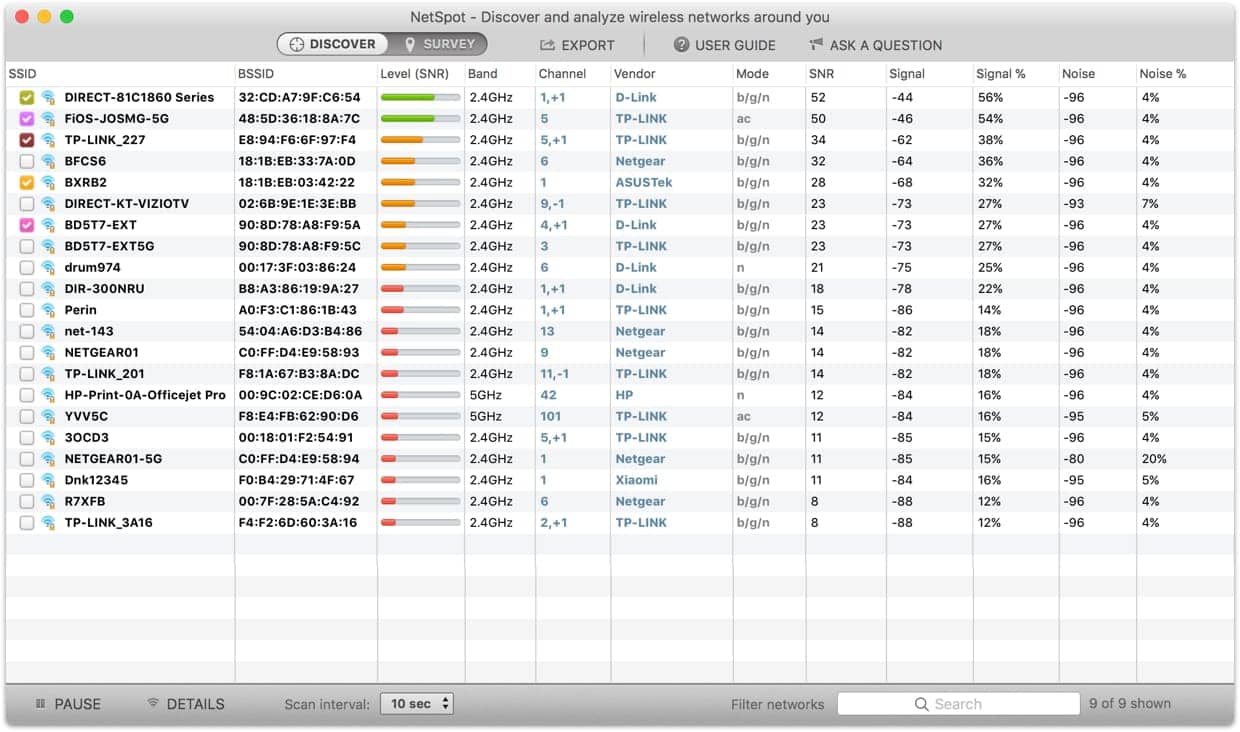
Getting the best tool to check WiFi signal strength is not easy. This is because there are hundreds of WiFi signal analyzers, and choosing a trusted one may not be an easy venture for a newbie. However, the NetSpot WiFi signal strength analyzer over time has proven to be the most outstanding amongst other WiFi signal strength analyzers. It has an attractive design with a user-friendly interface. The NetSpot is rated as one of the best apps for measuring WiFi signal strength because it is suitable for newbies and professionals network admins.
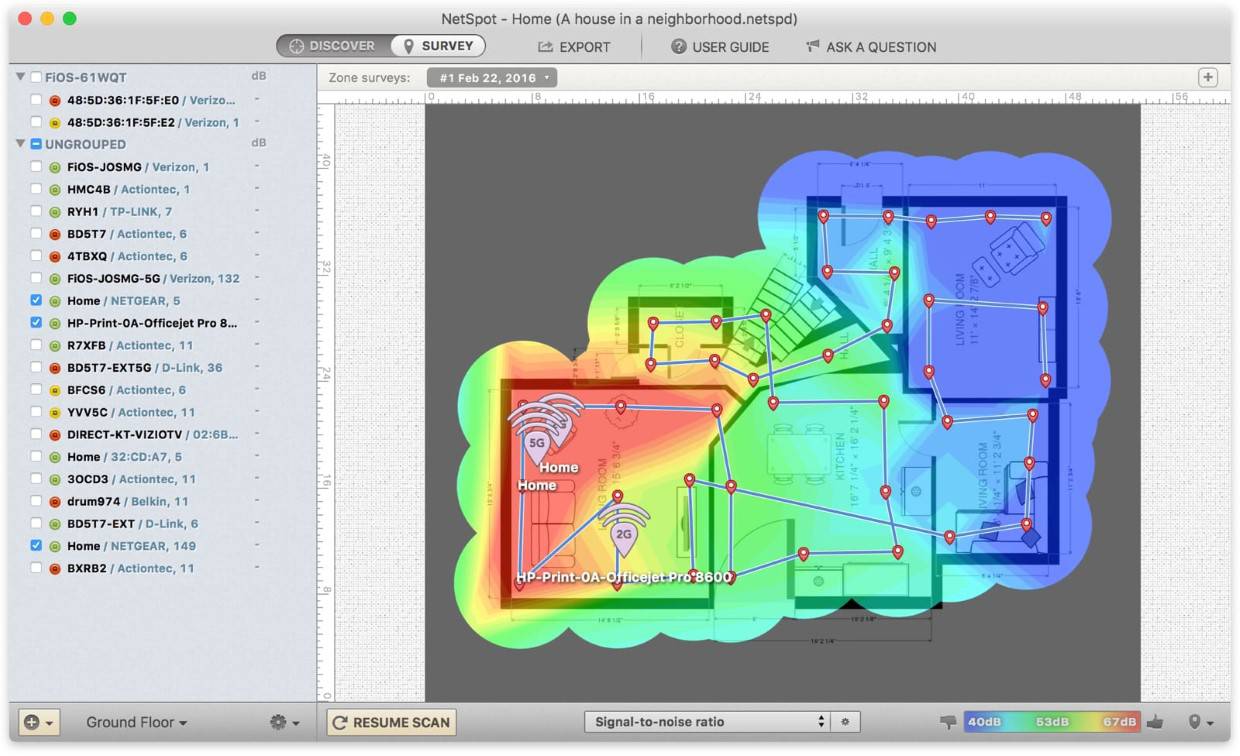
It makes use of two different modes to analyze networks, which are the discovery and survey mode. In the discovery mode, you can take a look at the various WiFi networks closer to you. While in the survey mode, you can check for more information on the heat maps of WiFi strength.
Features Of NetSpot WiFi Signal Analyzer
- Beautiful design.
- Easy-to-use interface.
- Best for beginners and professionals.
- Operates on two modes (discovery and survey modes).
- 4 different versions (free, home, commercial, and enterprises).
Steps To Activate NetSpot On Windows & Mac
NetSpot can be installed on your device within a few minutes. It contains several visual representations of the spectrum and data it can gather. It has four different versions, and each of these versions has different numbers of zones you can check on, the limit of access points that can be scanned and the rate of data points that can be connected for a scan.
You can activate the NetSpot WiFi analyzer by following these steps:
- Launch the app.
- Click on the “Activate” button.
- Paste your activation code and click Activate” (check your mailbox for the activation code).
For Windows Users:
- Launch NetSpot under your admin account.
- Make sure that NetSpot has the permission to write to the “C:\Program Data” folder.
- Note that it requires .net framework 4.5+.
Don’t get stuck with poor or weak WiFi signals. Make use of the right WiFi signal analyzer to bypass any obstruction and maintain an uninterrupted WiFi signal.


![]() © 2024
© 2024
0 comments